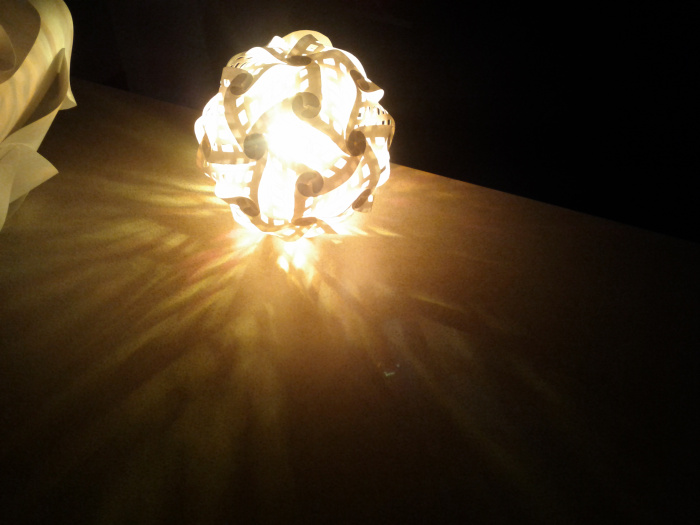
For my final outcome, I decided to use the IQlight pattern from Holger Strøm to create a globe-like lamp with perforated surfaces. The perforations in this surface would let light through the lamp and play shadows across surfaces. In my first experiment, I used regular paper; however, I didn’t succeed as the material let through too much light. I decided to use a thicker material the second time around. I used cardstock and this time my lamp proved to be successful.
Sunday, 22 January 2017
Friday, 13 January 2017
Catalyst - Development and Process
Continuing on with my project, I developed upon my research and picked out shapes and structures that I myself associate with minimalism and I brainstormed these ideas as my starting point. These vague ideas then developed into possible objects. I was first heading towards creating a shelving unit for a desk but then altered my idea to creating a desk lamp.
Lights shine in different ways at different angles and at different intensity’s; it all depends on the purpose of the light. I wanted my light to be intense and I wanted the user of my product to have the ability to shine the light at any angle they wish without having to move the position of the lamp.
I came up with a range of ideas for a desk lamp and even went on to create a design on sketch up, however, for me, these ideas did not impress me enough. I asked for some peer feedback on my designs. The majority of the feedback I received said my designs were original and there were some great forms however a popular comment I received was that my sketch up model looked more like a studio light rather than a desk light. I didn't receive the response I wanted and so I decided to act upon this feedback and go back and start experimenting again.
I created random forms made up of basic shapes and created effects with these using a light source. Some of these effects were created using a light shining into a translucent cylinder of paper. Different coloured lights, different materials, and different objects were used to get various effects. Others were from an object with a patterned opening and multiple light sources.
I shone my light through a cup of water, the water spread the light out and made it cover a bigger surface area which I found rather fascinating. The same results occurred when I shone my light through a cardboard box and paper box that had cut outs in it. This again intrigued me and inspired me to narrow my final idea down to a lamp with various cut-outs for the light to shine through.
Monday, 9 January 2017
Catalyst - Research
To begin this project I started out by researching minimal products and the way different designers approach this minimalistic theme in their designs. Through my research, I came across designer Victor Castanera. He worked with a Swedish design brand called oblure and crafted some beautiful minimalistic lamps.
Looking at his products, they seem to be a very conceptual piece of work between art and design. The fixed impossible position of the orbs is an expression of the fragility of existents. All of the entities move and nothing remains still. Balance is the main subject area in this product, everything is in motion. He has taken simple forms and created a unique masterpiece from it. This is something I am inspired to do in my work.
The lamp’s base is made from black marble to help steady the structure, while delicate hand-blown glass orbs sit around the light bulbs, slotted between the angular steel shelves. Black metal spheres have also been added, acting as a counterweight to the glass orbs.
Another designer that stood out to me was Hayden Martis. He released a collection recently called 'Fallen fall of Bowl'.
These bowls are not your regular shaped bowl; they are constructed of a more plane structure. The bowl can be used both ways; one side is much deeper than the other. The inner shaping of the bowl interior is designed to subtly differentiate the two offerings, all comprised of Italian stone and perfectly crafted in one seamless sculpture. The multi-use aspect of this bowl makes is a versatile product to have which is I think is great. It can be used as a bowl for fruit or a stand to place your keys on. People nowadays love products that can do more than one thing.
Sunday, 4 December 2016
3Rs Week 1 & 2
To
begin this project, I was given a packet of balloons which was the main
material I had to work with. I began by analysing and observing my object, I drew
some quick sketches of the balloons in different angles to help me generate
idea as I wanted to think outside the box and be innovative with my concepts
and designs. I thought about the purpose of a balloon, which is to be blown up
and used as decoration, however if you manipulate the object and cut it up into
strips it becomes a rubber material that I could weave or tie together rather
than an object that you just blow up.
I cut
up some of the balloons and attempted to weave them together however this wasn’t
very successful. After thorough research I felt inspired me Theresa Obermoser’s
geodesic igloos. The structure in her design was such a simple concept yet it
was rather extraordinary.
I decided
to create domes out of the balloons using glue and string and then use these
domes as part of a structure of a mosque. My design and making process was very
simple and straight forward but it was a challenge to come up with a decent
idea. I was overall really pleased with my final outcome. It turned out just
how I imagined and I didn’t face any major difficulties. Next time I would perhaps
create a structure that shows the interior rather than just the exterior so
that my projects are focusing more towards interior design and so that it can
be more of a challenge for me.
Sunday, 27 November 2016
Blog task
Throughout my time on this course so far, I have learnt many new things and developed upon my current skills. In the first project I worked on in 3D design, I took on an architectural approach to my project. This required me to use programmes such as Sketch up and Photoshop. Prior to this project I had no experience in using these programmes but after I gained a basic understanding and can now use these programmes without much of a struggle. I have also learnt how to manipulate a given object through 3D experimentation and recording process and how to analyse and visually communicate the function and form of a given object through the ‘3Rs’ project. By presenting my work in the form or presentation sheets at the end of project, I am now capable of presenting my work in a simple and effective layout.
I would like to improve upon my Photoshop skills, although I do have a basic understanding of all the tools and function, I find it difficult to manipulate an image and make it look realistic such as the photo shop edit I did in the first project. Something I would like to learn in the future during my course would be how to use other software programmes such as solid works and also how to 3D print.
Sunday, 20 November 2016
Still light Week 1 and 2
My new project 'Still
Light' began with researching and creating a mood board on Pinterest of my
given person who was Charlie Brown. By creating a mood board of Charlie Brown, I
was able to pick out the different colours and shapes that relate to him such
as yellow and black and the signature zig zag on Charlies t-shirt. The overall
mood I felt when looking at my completed mood board was mellow and relaxed and
this is the feel I wanted my final outcome to give.

After my research, I moved
on to experimentation. As I had never worked with light before I wanted to
explore the different ways in which light can work within 3D forms. I created a
number of 3D forms and placed a LED light strip in them. I created different random shapes so that I had a variety of different forms to explore and experiment with. At this stage my
design and ideas were diverse and spontaneous, some of my designs were rather
abstract and I felt like the shapes I used in these designs fitted in well with
the theme that I was going for. Something I found difficult during this process
was creating a form that would hide the light source and give a clean and immaculate
final outcome.
After testing my initial
ideas with the LED light, I narrowed my ideas down. I really liked how the
triangular structure worked as a body for my lamp. The light bounced off well on
all corners and gave off a nice beam of light. I decided that I wanted the main
design of the lamp to be the zig zag on Charlie’s t-shirt and I wanted my lamp
to be a desk lamp. I wanted it to be aimed towards children and comic nerds so I
had to keep my design funky and fresh.
I began to test out
some of my designs to see how they would work. The first design I tested out
was a sphere made from wire with a zig zag hanging from the middle which would
be the light source. Once I finished making this model, I decided I didn’t really
like it, it didn’t work as a desk lamp and reminded me too much of a globe and
the design wasn’t very stable.

I then created another design, this one was
formed of three long triangle prisms to form a triangle, this design was very abstract
and unique and I felt like it worked really well so I decided to develop upon
this design.
To make my design
relate to Charlie Brown, I wanted my lamp to have a strong graphic touch to it,
so I decided to create the triangle prisms out of clear acetate and border it
with a thick black tape. I feel like this worked really well. The clear acetate
gave the design a minimalist touch.
Overall I was pleased with my final outcome, It looked interesting and fitted in with the theme I going for. However something I would improve about my design would be making sure that the light source was hidden away and not visible so that the final lamp looks immaculate and not messy.
Sunday, 6 November 2016
Fixtures and Fitting Week 2
After a week of inspiration, I started to plan out my final
outcome. I developed upon my objects and did some sketches with tracing paper
to generate more ideas. This process was fun and experimentive. I focused on picking out the different shapes and angles within my objects so that I could develop them into a structure for a building.
One image I took of my objects stood out to me the most
and I decided to develop upon it. The image initially looks like a bundle of
mess but I managed to form a design of an architectural structure out of it.
After this stage, I decided what I wanted the building I was designing to be. I
came up with the idea of a house built for an artist. The house has two sections,
one being the living space and the other being a working studio. The main
structure is made from cross-laminated timber. The large windows also provide natural
light to flood the interior. I worked on some sketches on sketch up.
The next step for me was creating my building. I created a
net on card and cut it out to see if it all fits together and to see if my
final outcome needs any amending. I was pleased with how it turned and out and
then I created my final outcome. I used foam board to represent the timber; this
was an easy material to work. Overall this project was a great start into my pathway, I became familiar with programmes such as Photoshop and sketch up and I developed my skills. My final outcome is presented below in my presentation sheet.
Subscribe to:
Posts (Atom)